Friday, June 29, 2012

The Flag Pallet


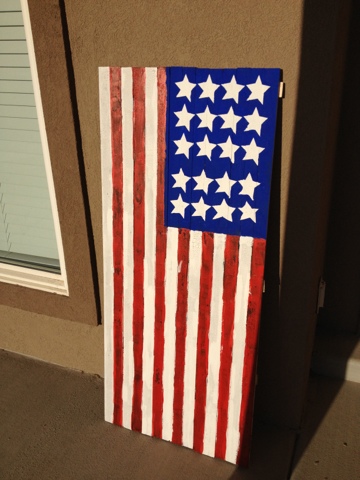
So it's not actually made from a pallet.  I bought a fag of wood (I seriously just wanted to say fag as the legit description for a bundle of sticks) at Home Depot.  I LOVE home depot.  Anywho, after nailing and glueing them all together I spent much time painting them.  I am the WORST painter.  I painted and touched up and painted more...  It never ends but I'm done.  I'm still not happy.  But I'm done.  I used some stuff to make the paint "crackle" to give it an old fashioned look.    Anyway, it's four days to Independence Day but I got it out in time!  

Happy Fourth of July Everyone!
Friday, June 22, 2012

Nightgown #2


This is my second attempt.  It was MUCH easier this go around.  The most difficult aspect was not having a pattern.  I keep second guessing myself.  Hopefully I can make #3 a little more comfy.  

Thursday, June 21, 2012

Pillowcase Nightgowns


BEFORE


AFTER


It is so hot here in Utah.  It's been around 100 and the little girl above refuses to sleep without a blanket.  She'll be snuggled up in her bed sweating away in her "pink blankie."  She also MUST wear jammies.  I would definitely let her sleep in her underoos just so she didn't overheat but she won't have it.  So here was the best solution I could come up with.

At walmart they had a pretty big selection of fabric they were selling for $1 a yard.  Mind you it's not the prettiest stuff but it looks perfect for those old school nightgowns your grandma would have made.  Plus when you are five, you don't care.  I wasn't planning to buy fabric for nightgowns yesterday.  I went to buy fabric for another project (I'll share it later)  But for A BUCK a yard I couldn't resist so spent five dollars and five different patterns.  Now the other thing you should know is that I really do have quite a bit of fabric already.  So I knew that if I didn't use this fabric (even if it only cost $5) and Korry found out there would be you know what to pay.  So I immediately set about to make a nightgown.  I saw a picture on Pinterest of someone who made nightgowns from pillowcases they had.  Easy huh?  I can totally make a pillowcase.  It's the only thing I mastered in the high school sewing class I took.  So all that was left was to add straps to the top.  I thought it would be easier then it turned out being.  That's why there are two different approaches at the same nightgown.  I also didn't want to spend more than $3 on each nightgown, otherwise they lose the fun of being frugal and that dollar fabric I scored really loses it's appeal.

So after two days or about seven hours (yeah it seriously took me that long), a lot of heartburn, and some serious frustration here is the first of five nightgowns.  The first one, the straps were too long and it kept falling off.  The second one is fine but the straps are a bit too tight and she has a hard time getting it on and off.  So hopefully I can learn, learn, learn.  Aren't you proud of me!  I didn't give up.     Now I just need a serger.  I hate sergers.  


Upcycled Oatmeal Container to TP storage


Now that I am pregnant I am always in the bathroom.  You wouldn't believe the amount of toilet paper we go through in this house (with two small children esp.)  Isn't it the worst when you use the bathroom and there is no toilet paper left!  This happens to me a lot because my kids AND husband have some disease that prevents them from putting a new roll on.  So this was a solution.

You take an empty oatmeal container.  Cover it in 12x12 paper (you'll need two sheets, one isn't enough) and then mod podge over the paper two make it glossy and somewhat water proof.  Then add an embellishment.  I used raffia because I think it's beautiful and it reminds me of straw, which reminds me of barns, which reminds me of Wyoming.  The picture above doesn't show it but I spray painted the lid metallic silver so that it looks like it's made of metal instead of cardboard.  All in all, I really love it.

Now I just need to remember to keep stocking the oatmeal container....  Or basically it's pointless and I'm still out of TP.

Kitchen Wall Hanging


Isn't this cute!  I love the paper.  Again, it has a country feel and makes me think of Independence day.  I bought the letters for $1 each at hobby lobby and then mod podged the paper to the letters.  Then mod podged over the letters to seal them.  Used sticky tack to hang them to the wall.  I REALLY wanted it to say "YUMMO"  ( I LOVE LOVE LOVE the movie Ice Age and Sid says yummo)  but they only had ONE M!  How unlucky!  So yum it is.  Now I just need to get some other stuff to go on top of the cabinet with it.  It look lonely up there doesn't it?  I REALLY love teapots.  (I HATE tea)  but I have always had a secret love for tea pots.  I was hoping to use them in my decorating somehow.  

Office Window Coverings


Welcome Wreath


I love wreaths on doors.  Not just at Christmas.  But they are also expensive! So I wanted a way to be able to cheaply decorate a wreath for different holidays and seasons.  I bought this (is it wood..  I don't know what that stuff is exactly made from)  wreath from Joannes for $5.  The other embellishments I picked up at the local dollar store (with the exception of the little flip flops, those were Eli's when he was a tadpole.)  I think it needs some more things on there but I should probably change it for the 4th now anyway.  (If I get the energy)  

No Soliciting Wooden Door Sign


I had a board lying around.  I painted it with some cream colored paint and then used my cricut to cut out a flower stencil and the "No Soliciting" letters.  I then used a sponge to add the ruffed up blue paint to the outside.  

I am SO SICK of solicitors.  I get tons of them at my new house.  However, even though I was excited about the sign now that it's on my door it's WAY too big.  I didn't want it to be so obvious or seem like a billboard.  You can seriously read it from across the street.

Bow & Headband Organizer


Kennadee has soooo many bows and clippies and ribbons etc.  I can't keep them in one place.  I saw this great idea on Pinterest.

I bought a frame at Ikea for $10.  (First I bought a $5 one from Walmart but it cracked as I tried to add hooks so I had to find something thicker and more expensive)  Screwed in small hooks to the bottom so that you could hang those baby headbands on and then spray painted the whole thing blue.  I then used hot glue to attach some flowery ribbon and then hung the whole beast to the wall in Neddy's bathroom.  And there you have it, no more digging for hair accessories!